Contents
Overview
This shield provides GPRS/GSM service to Arduino. With this shield attached (together with a SIM card), Arduino could join its local mobile service provider’s cellphone network and start communication via SMS, Voice, DTMF, and GPRS service.
This shield connects to Arduino with long-wire headers, which keeps the pin layout intact and allows another shield to be stacked on top.
Features
- Selectable HW/SW serial port via onboard jumpers.
- Quad band global network support.
- Integrated TCP/IP stack.
- Onboard earphone and microphone connectors.
- Onboard LED indicators for Ringing, Status, Network and Power.
- DTMF enabled SIM900 firmware.
- High-efficient onboard DC-DC convertor.
- ESD Protected SIM card and Audio interface.
- SMT machine assembled and high quality PCB
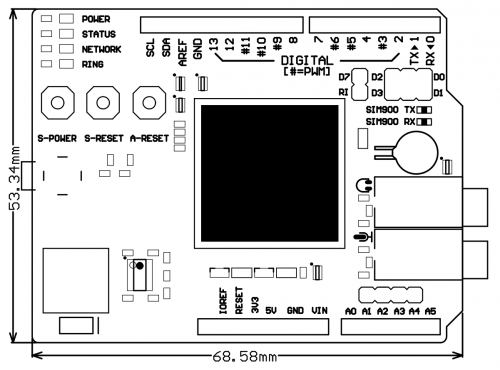
Pin Configuration
The pin usage is basically the same with the official version.
- D0: HW Serial Port SIM900->Arduino
- D1: HW Serial Port SIM900<-Arduino
- D2: SW Serial Port SIM900->Arduino
- D3: SW Serial Port SIM900<-Arduino
- D7: Ringing Indicator, active LOW
- D8: SIM900 PowerON
- D9: SIM900 Reset
- VIN: Drawing power from Arduino
NOTE: By default, the serial communication is done via the SW serial port (D2, D3) and the RI is connected to D7 via a jumper. To use the HW serial port (D0, D1), two jumpers should be changed so that they connect the SIM900 TX pin to D0 and SIM900 RX pin to D1. If the Ringing Indicator feature is not needed, the jumper could be removed from the header denoted “RI”.
Buttons
- S-POWER: Power switch button of SIM900.
- S-RESET: Reset button of SIM900.
- A-RESET: Reset button of Arduino.
LED Indicators
- RING: On when there is a incoming call
- NETWORK:
- Flash@inverval 800ms: SIM900 not registered to cell phone network.
- Flash@inverval 3000ms: SIM900 registered to cell phone network.
- Flash@inverval 300ms: GPRS communication is established.
- STATUS: On when SIM900 is powered on.
Quick Start Guide
- Download the Library and Example code. Do not unzip the downloaded library, leave it as is.
- In the Arduino IDE, navigate to Sketch > Import Library. At the top of the drop down list, select the option to “Add Library”.
- From the prompted window, navigate to the .zip file’s location and open it. The library and example should be ready for use1.
- Attach the shield onto the Arduino Board.
- Connect a DC power supply(7V-12V) to the barrel connector of the Arduino board.2
- Open an example sketch under File > Examples > GSMSHIELD. Available examples are:
- GSM_GPRSLibrary_AT
- GSM_GPRSLibrary_Call
- GSM_GPRSLibrary_Client
- GSM_GPRSLibrary_GPS
- GSM_GPRSLibrary_Server
- GSM_GPRSLibrary_SMS
- Upload the sketch to the Arduino board.
- Press and hold the S-POWER button on the shield until STATUS LED goes on in order to turn the SIM900 on.
- Press the A-RESET button to reset your Arduino in order to run the sketch.
Note1: The automatic installation of library described in Step 1-3 requires Arduino 1.0.5 and above. If earlier version of Arduino is used, manual installation of library may be required.
Note2: The peak current of the SIM900 module may reach up to 2A. External power supply via the barrel connector is recommended because it provides sufficient power to the shield. Without the external power supply, the SIM900 module may lock up or suffer from unexpected reset.
Resources
Dimensions
Hi,
With the shield, what sequence of AT commands would i use to setup the sim900 modem to be able to “ping” a server/website to check connection.
Any help is much appreciated.
Cheers.
Sorry for the late reply, please refer to http://www.mt-system.ru/sites/default/files/docs/documents/sim900_ping_atc_v1.00.pdf
Is the “LED Indicator NETWORK Flash@interval xxx ms” available at any port?
I think about the measurement of time of the interval to detect the status of the connection and accordingly to attach an external LED.
Thanks you in advance and Cheers
Glenn
There is no port available to check the network status. You can use “AT+CGREG” which is described on page 166 on http://sandboxelectronics.com/files/SLD-000012/SIM900_AT.pdf, to get the network status.
I hope above information will help.
Best regards,
Kim